Loyal GT readers might already know that Google Photos offers two settings to take a backup of your photos — High Quality and Original. The former lets you upload all the pictures and videos that you want at compressed quality, while the latter saves a copy in the same quality as they were shot in. But the best part about it is that Google Photos doesn’t make you stick to any particular upload setting permanently. So if you are looking to switch over from the Original upload setting to High Quality or vice versa, then it’s best to know what exactly to expect. Let’s find out.
Original to High Quality
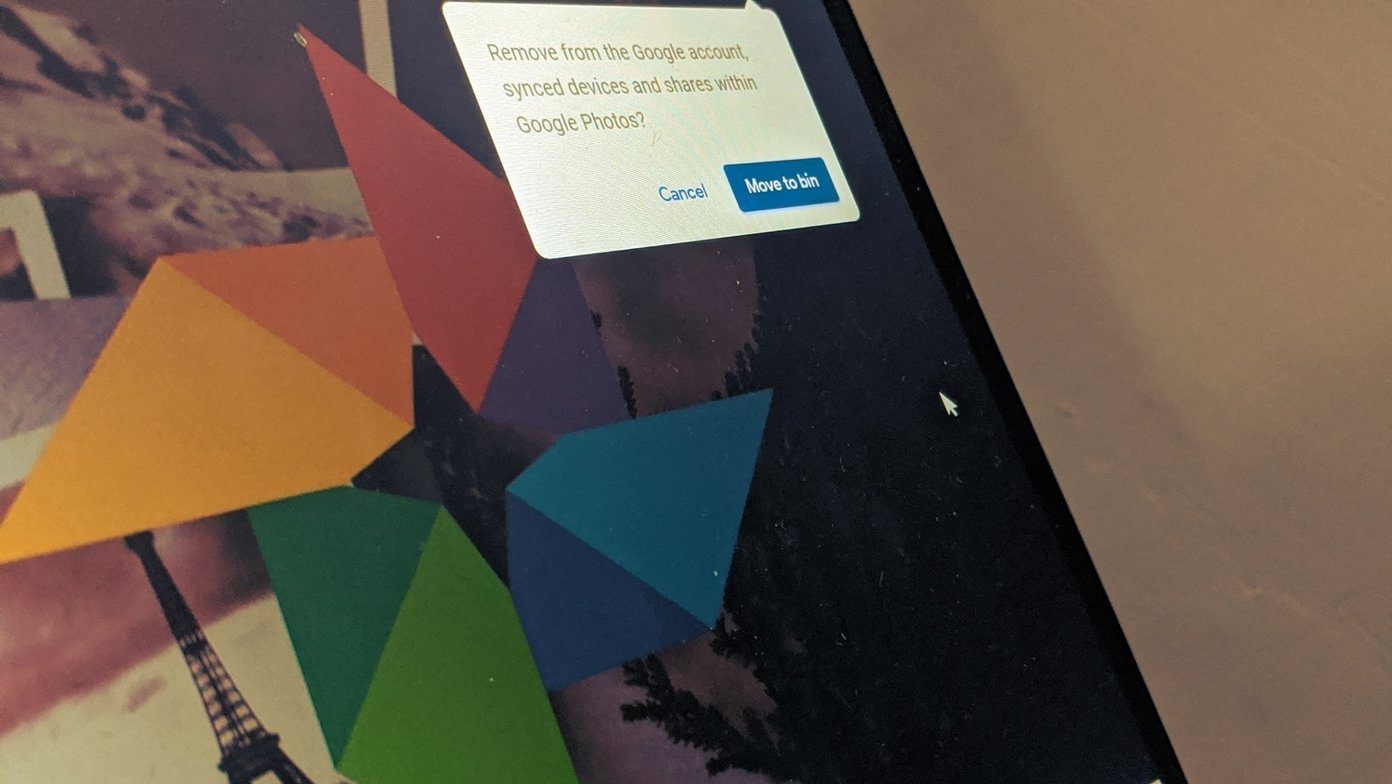
Let’s assume you selected the Original upload setting in Google Photos thinking that the 15GB of free space was enough for you. Well, you were wrong. Or maybe you are on a paid tier, and you realized that Google Photos has just about maxed out your quota. Then it is wise to switch to High Quality — this setting doesn’t consume even an iota of storage. It is also one of the key features that makes Google Photos so great. And it’s super-easy to change quality settings. Just head into the Google Photos Settings panel, and then select High Quality from underneath Upload Size. After you do that, all the photos you click will upload at a compressed quality. For example, a 10MB image will end up at around 2-3MB once Google Photos has had its say. And in addition to that, any images that exceed 16-megapixels will be resized to 16-megapixels only. Meanwhile, the resolution of the videos will be capped up to 1080p. But regardless of the compression and downscaling, your photos and videos will still look great for most purposes. You won’t notice any difference unless you look really close. The lossless compression algorithm that Google Photos uses is the real deal. Unlike most Google Photos settings, changes to the upload quality settings won’t sync between devices (except on the web app, which is just the same everywhere). So you can choose to use the High Quality setting on one device while keeping it at the Original setting on another. But what about the photos and videos that are already backed up to Google Photos in Original quality? Well, they will continue to be stored in the same quality, using up storage in the process. However, you can convert them to High Quality and free up some space. Head to the Settings panel using the Google Photos web app. Then click the Recover Storage option under the quality settings (mobile apps don’t feature this option). On the confirmation box that pops up, click Compress, and you are good to go. Using the Recover Storage option may also impact photos and videos uploaded via other Google services such as Blogger, Google Maps, Hangouts, etc. For a complete list, click the Learn More option on the confirmation pop-up box.
High Quality to Original
You can switch to Original uploads if you are not happy with the compression in the High Quality setting of Google Photos. Any pictures and videos that Google takes a backup of after that will be uploaded in the same quality that they are shot in. It’s the best option for taking a backup or syncing RAW images. Also, you can ensure that your photos don’t lose any depth data due to compression. However, they will end up consuming storage space, so if you shoot lots of photos and videos, be prepared to upgrade sooner rather than later. When switching from Original to High Quality, your photos get automatically resized. That doesn’t happen with your existing photos in High Quality if you switch back to Original quality. Yes, you will have to settle with the High Quality images. Even if your devices still have the originals intact locally, Google Photos will not re-upload them and replace the High Quality backups. However, you can choose to sign out of the Google Photos mobile or desktop apps, delete all your backed up data via the web app, and then sign back in and re-upload your originals from scratch. This process can get quite convoluted, especially when there are multiple devices involved. So you will risk losing your photos and videos. Hence, it’s best to download and back up your existing Google Photos library. Also, it is wise to take a backup of the copies present on your devices.
Take Multiple Backups Smartly
Google Photos offers one of the most convenient means to upload your photos to the cloud. And with the ability to readily switch between both modes, it’s just so flexible to use. But you must always remember the possible implications, especially when switching from Original to High Quality since you can lose access to your originals gradually over time. Hence, it’s always best to have an additional backup for your photos and videos, either to another cloud storage service or offline. That doesn’t apply to just Google Photos. When it comes to backups, that’s just good practice. Next up: Your pictures on Google Photos isn’t as private as you might think. Shocked? Well, then you should read the next post to find out exactly who can see them. The above article may contain affiliate links which help support Guiding Tech. However, it does not affect our editorial integrity. The content remains unbiased and authentic.